Wednesday, December 29, 2010
Sunday, December 12, 2010
Edible Stained Glass Gingerbread Cookie Ornaments
 Are you ready to make some cool cookies for the holidays? It's Chef Tess here, wanting to add a little fun to your days. Here's a great idea...
We've been making some Edible Stained Glass Gingerbread Ornaments Friday in preparation for the next segment we'll be doing on Fox 10 this upcoming week with Face and Little man. I first saw these Stained-Glass Ornaments on Epicurious.com. So we spent Friday morning crushing candy in the food processor and making the cookie dough.
Stained-Glass Ornaments
3 cups all-purpose flour
1 teaspoon baking soda
1/4 teaspoon salt
3/4 teaspoon ground cinnamon
1/2 teaspoon ground ginger
1/8 teaspoon ground nutmeg
3 tablespoons unsalted butter, at room temperature
1/2 cup firmly packed dark brown sugar (I used white sugar)
3/4 cup unsulfured molasses ( I used maple syrup)
1/3 cup water
6 ounces translucent hard candies in colors of choice, crushed (in a food processor)
Preparation1. In a large bowl, whisk together the flour, baking soda, salt, cinnamon, ginger, and nutmeg. Set aside.
2. In a large bowl, with an electric mixer, beat the butter on medium speed until creamy. Add the sugar and molasses and beat for 2 minutes. Beat in the water. On low speed, beat in the flour mixture until a soft dough forms.
3. Gather the dough into a ball and wrap in plastic wrap. Refrigerate until firm, at least 1 hour or up to overnight.
4. Preheat the oven to 350°F. Line cookie sheets with parchment paper.
5. Divide the dough into thirds. Divide each third into 10 equal pieces. Using your palms, roll each piece on a lightly floured work surface into a rope 1/4 to 1/2 inch in diameter. Gently trace the design of your choice onto the prepared cookie sheets (a wooden spoon handle or chopstick works well for tracing on foil). Outline each design with a rope of dough, pressing the ends together to seal securely.
6. Sprinkle the inside of each design with the crushed candies, dividing the candies evenly among the outlined designs and creating an even layer.
7. Bake in the center of the oven or until the edges of the cookies are golden and the candy has melted, 6 to 9 minutes. Let the cookies cool on the cookie sheets on wire racks until the candy hardens, about 5 minutes. Gently peel the parchment away from the cookies and transfer to the racks to cool completely.
Cookie Exchange Tip:
To make this cookie into a tree ornament, attach a loop made from the dough to the top of each cookie before baking. After the cookie is baked, thread a piece of ribbon through the loop and tie the ribbon in a bow. To make these ornaments at a party, prepare the cardboard patterns in advance.

There you go. I'll add more pictures soon on the process, but couldn't resist sharing the recipe quickly. Most likely you'll need adult help with this project. But have fun, we sure did!
Saturday, December 11, 2010
Christmas countdown
Okay everyone, it's Little Man here. Hope you enjoy our Christmas countdown! I'm getting so excited for Christmas!!
Good luck troops
Christmas is coming!
Saturday, September 18, 2010
Cream Cheese Spritz Cookies

 One day we had to make some cookies for this dinner at a friends house and we wanted to use the new cookie press that I got for my birthday a week ago, and so we looked at the website that was on the box. And it came up with some recipes that we could use, And we all liked the "Cream Cheese Spritz cookie" one and when we tried it, we liked it a lot, so Here it is.
Cream Cheese Spritz cookies.
Makes 4 dozen cookies.
Preheat oven to 350 degrees F.
Ingredients:
(mind you when we made them we did a double batch so don't be confused when you see the pictures)
1 cup softened butter
 1 (3 ounce) pkg softened cream cheese
1 cup sugar
1 egg yolk
1 tsp Madagascar Pure Vanilla Extract (you can use plain vanilla extract too)
1 tsp grated lemon peel ( and if you don't have any you can just use some lemon juice too)
2 1/2 cups flour

1/2 tsp salt
Cream butter and cream cheese together.
Add sugar and mix well until light and fluffy.
Add egg yolk, vanilla and lemon peel. Mix well.
Gradually add flour and salt to cream mixture.
Shape dough into small logs and place in cookie press
(or in stead just roll out the cookie dough, cut, and put onto cool ungreased cookie sheet)
Press cookies onto cool ungreased cookie sheet.
Bake 12-15 minutes or until lightly browned.
Store in an airtight container at cool room temperature for several weeks or freeze for 2 months.

Perfect Freezer Friendly Dinner Rolls

This is a recipe from our nice friend Chef Tess. Here is the recipe from her blog, Perfect Freezer Friendly Dinner Rolls.
Dinner Rolls

Combine:
1 1/4 cup water (no hotter than 110 degrees)
2 tsp yeast (1 packet) rapid rise
 2T sugar (1T honey)
4 1/4 cups all purpose flour (whole wheat works too)
1 1/2 tsp salt
1 1/2 tsp salt
6T oil (original recipe called for 12T of melted butter)
1 egg
2 egg yolks
 Combine everything in one large bowl or mixer. I like that. Knead 5 minutes by hand or 3 minutes in a mixer on medium setting. This is a less developed dough as far as gluten is concerned.
Form into a ball and place in a bowl covered with plastic or a lid for 1 hour, or until doubled in size.

Punch down dough and divide into 2 pieces. I kind of put them in a log form. this helps to keep things pretty even. Divide the two logs in half again, so you have 4 logs. Each one will get cut into 6 pieces.
Now, lightly (I do mean lightly) dust the counter top with a little flour...just a little. We don't want the rolls sticking too much. On the other hand, we don't want so much flour that they just roll all over the place. The point is, we want a little tacky stuff so they form correctly. Take the dough piece and pinch the sides together...
You want the dough balls to look like they have a skin holding them together. Place the rolls on a pan lined with parchment paper (or a freezer friendly pan for easy make and bake). If you use metal pans, you don't have to worry about the glass shattering going from the freezer to the oven.
Allow to raise at room temperature, uncovered for 35-40 minutes, until the rolls are touching if originally placed 1/2 an inch apart. Bake 375 degrees 20-25 minutes until golden brown.

Chef Tess’s Blog. And here are pictures of us eating them:
I Like my rolls plain, they are fine just plain and with nothing on them and are pretty good too :)

My sister has butter on her roll.

My other sister licks up the rest of her stew with her roll. And my brother does the same thing with his roll too.


One time we used the same recipe but we made them into hot dog buns instead :) And here is my other brother with his hot dog.
Monday, August 30, 2010
CAKE DECORATING!!! Part 2
So, my fascinated readers its Ema Bug again.
Here is the second part of my CAKE DECORATING!!! post. So in my last post I explained what we did last week and how I made my cake. Now is the part of how I decorated it. Here are some pictures I took;
So, I hope you enjoyed! The cake tasted like a muffin (I added too much flour) and was pretty good. Have a good day!!
SMILE!! Your Author, EmaBug
Here is the second part of my CAKE DECORATING!!! post. So in my last post I explained what we did last week and how I made my cake. Now is the part of how I decorated it. Here are some pictures I took;
 | |
| My wonderful cake and frosting |
 | |
| My friend, Silly Sam, in her yellow apron |
 | |
| It's on it's way! |
 | |
| Silly Sam frosting her homemade sponge cake |
 |
| Time for the fondant!! |
 |
| My blue fondant!! |
 | |
| Silly Sam's and my cakes, all frosted |
 |
| Silly Sam's, Merisa 2, Mine, Ivy on the wall, cakes. |
 | |
| Merisa 2, another friend, cake finished! |
 |
| Ivy on the wall, another friend, cake finished!! |
 |
| My two cakes finished!! |
So, I hope you enjoyed! The cake tasted like a muffin (I added too much flour) and was pretty good. Have a good day!!
SMILE!! Your Author, EmaBug
CAKE DECORATING!!! Part 1
This is Ema Bug everyone.
So, last week, we did cake decorating at our house. We had to make our own cakes and at my house we were out of boxes of cake mixes, so I had to make mine by scratch. I got the recipe of our friends blog, Chef Tess. We haven't eaten the cake quite yet but it looks really good. Here's the recipe:
My Chef Tess Cake mix
dry ingredients:
4 1/2 cups all purpose white flour
1/2 cup cornstarch
2 1/2 cup sugar
2T baking powder
1T salt
1 cup shortening (or butter )
1T double strength vanilla
Sift flour, cornstarch, baking powder, and salt through a flour sifter at least once to remove extra lumps. Combine shortening (or butter) with dry ingredients and vanilla in a Kitchen Aid type mixer with paddle attachment. Mix until well combined.
If you don't have a mixer, it also works to cut the shortening into the flour as you would for pie crust and then run the mix through a hand held flour sifter to make the mixture more smooth. The metal flour sifters are available to purchase at most grocery stores and baking sections of Wal-mart or Target.
Yields 9 cups cake mix. If you use butter, please keep your mix in the fridge!
4 1/2 cups mix equal to one boxed cake mix:
Combine with 3 eggs
1/3 cup oil
1 1/3 cup water
200 strokes by hand or 3 minutes medium speed.
Bake time 350 degrees:
Pan size: 2 8 inch 33-35 minutes
2 9 inch 28-31 minutes
13 by 9 inch 32-35 minutes
bundt 38-43 minutes
24 cupcakes 18-21 minutes
High altitude: stir 1/4 cup all purpose flour into mix. Mix as directed.
More cake mixes to follow as experimentation continues.
My next post I'll post what I did with the cakes.
SMILE people!!!
So, last week, we did cake decorating at our house. We had to make our own cakes and at my house we were out of boxes of cake mixes, so I had to make mine by scratch. I got the recipe of our friends blog, Chef Tess. We haven't eaten the cake quite yet but it looks really good. Here's the recipe:
My Chef Tess Cake mix
dry ingredients:
 | |
| The dry ingrediants |
4 1/2 cups all purpose white flour
1/2 cup cornstarch
2 1/2 cup sugar
2T baking powder
1T salt
1 cup shortening (or butter )
1T double strength vanilla
Sift flour, cornstarch, baking powder, and salt through a flour sifter at least once to remove extra lumps. Combine shortening (or butter) with dry ingredients and vanilla in a Kitchen Aid type mixer with paddle attachment. Mix until well combined.
 | |
| The dry ingredients mixed together |
If you don't have a mixer, it also works to cut the shortening into the flour as you would for pie crust and then run the mix through a hand held flour sifter to make the mixture more smooth. The metal flour sifters are available to purchase at most grocery stores and baking sections of Wal-mart or Target.
Yields 9 cups cake mix. If you use butter, please keep your mix in the fridge!
4 1/2 cups mix equal to one boxed cake mix:
 | |
| The wet ingredients |
1/3 cup oil
1 1/3 cup water
200 strokes by hand or 3 minutes medium speed.
Bake time 350 degrees:
Pan size: 2 8 inch 33-35 minutes
 |
| The wet ingredients mixed together |
13 by 9 inch 32-35 minutes
bundt 38-43 minutes
24 cupcakes 18-21 minutes
High altitude: stir 1/4 cup all purpose flour into mix. Mix as directed.
More cake mixes to follow as experimentation continues.
My next post I'll post what I did with the cakes.
SMILE people!!!
Thursday, August 19, 2010
Monday, August 2, 2010
Chicken Noodle Soup with Homemade noodles
 The Bakeroose got together for some amazing fun making homemade noodles for chicken noodle soup.
For the soup you will need:
1/2 lb chicken breast or thigh meat, without the skin and bone, chopped
2 carrots, chopped
2 stocks of celery, chopped
1/2 onion, chopped
10 cups of chicken stock (or bullion that is mixed with water, usually about 1 tsp per cup)
salt and pepper to taste (usually about 1 tsp each)
Poultry seasoning (about 1T)
One recipe of homemade noodles (yes...it's here in this post)
Equipment:
1 1/2 gallon pot
large wooden spoon
knife
cutting board
rolling pin
measuring cup
 If you have never made homemade noodles before, the directions will be here after we show how to cut the veggies. First up, how to cut an onion. If you are allowed to use a knife, this can be a really cool trick. A lot of adults don't know how to quickly and effectively cut an onion. Let's show them how it's done. First, cut the onion in half right down the center to where the root is still attached to the bottom and the top is still in tact all the way up.
 Cut the top off.
 Cut the root off, but don't cut too deep into the bulb of the onion. The root will help hold it together when you cut it.
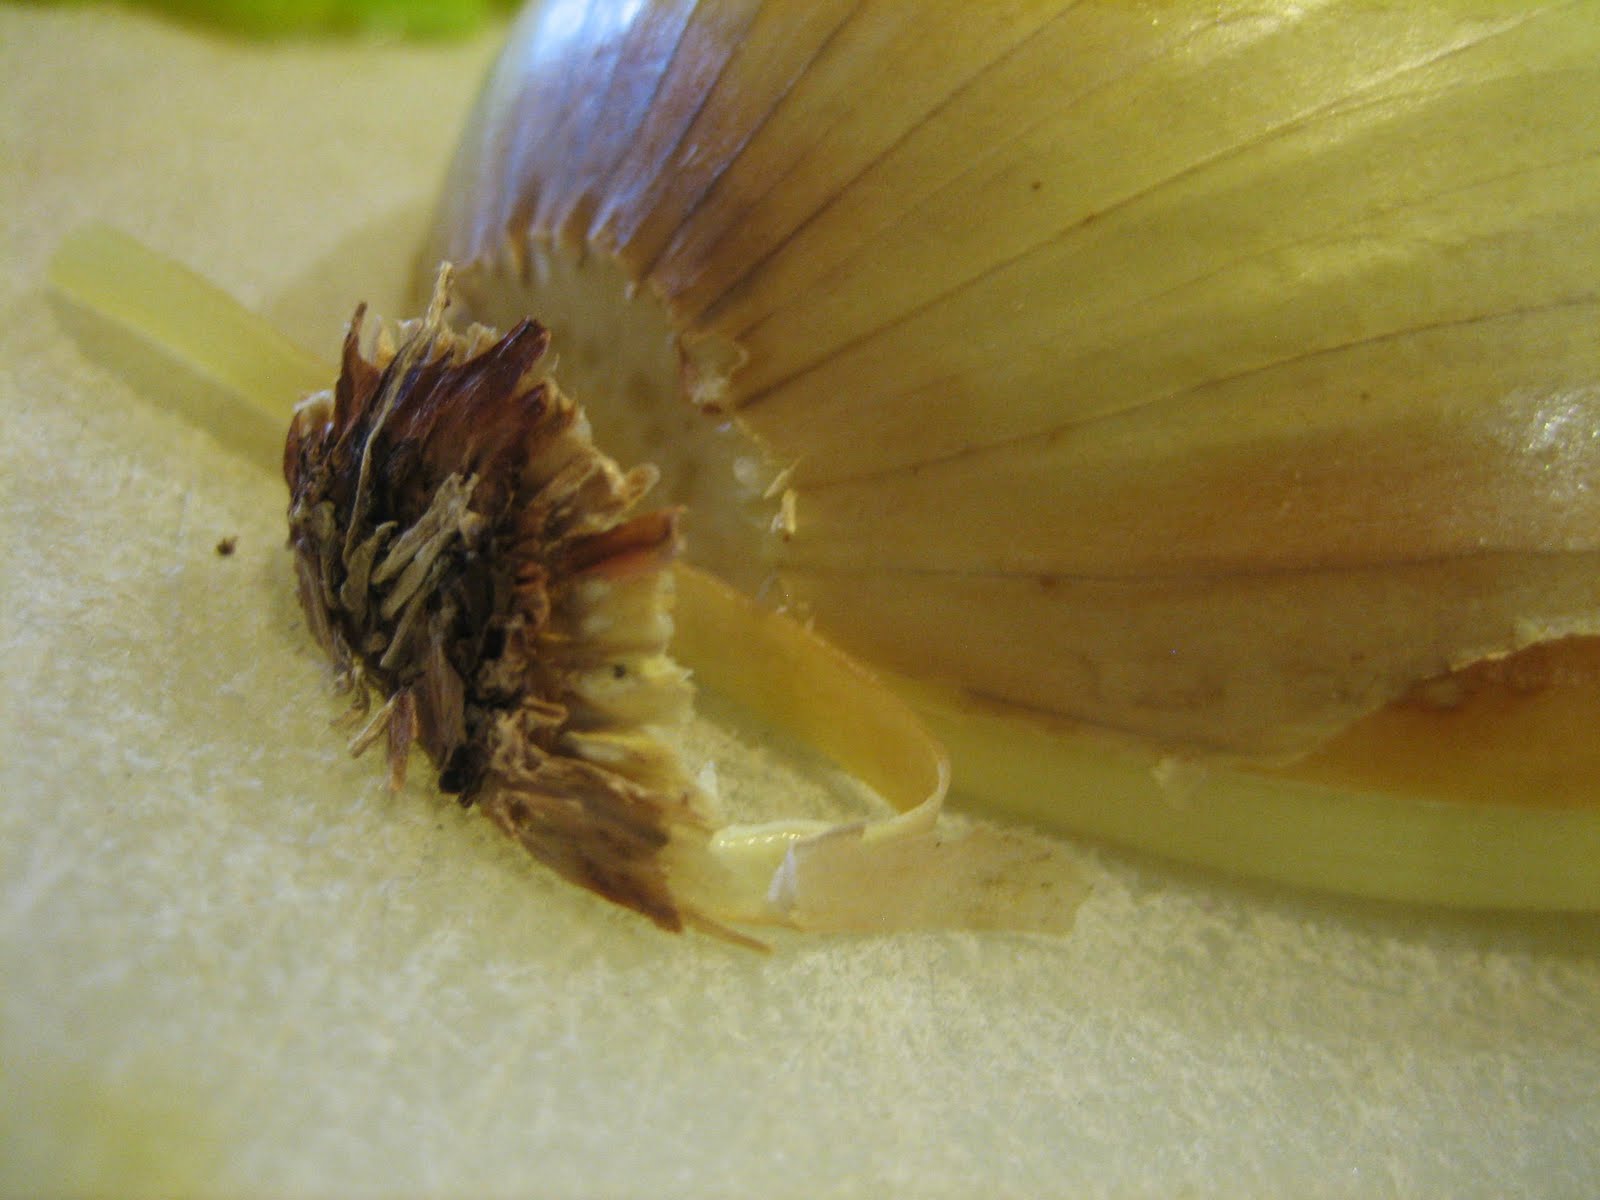 Remove the outer paper-like layer of the onion. Now, make even cuts all the way through the onion, but being careful again to not cut through the root area. Look at the next picture to really get a good idea of what it should look like.
 Dolphin Girl cut this one. It's perfect.
Now, Chef Tess held the camera while Dolphin Girl cut the rest of the onion. Notice how we cut all the way through the onion going the other direction?

Repeat that chopping and you will have a pile of chopped onions very quickly.

Combine the chopped celery, onion and carrot in the 1 1/2 gallon pot. Add 1-2 tsp of vegetable oil to the pot and saute the vegetables until the onions look clear. Add the chicken and the chicken broth.
 Mrs. Tracey from"Preparing Wisely" Food Storage Store brought this awesome Chicken base that we used for the stock from her store. It was so tasty...and had no MSG. Thank you Mrs. Tracey!
Now, while the chicken and veggies cooked we made the noodles.
 I wanted my children to learn how to make noodles without a hand cranked pasta machine. Why? Well, let's just say for argument's sake, they ever where to want pasta, not have dry noodle...and not have a pasta crank? What then? Rice? No...not if I can arm them with the mental ammo to make a good noodle. Use the noodle to make the noodles (so to speak). Look at these noodles...
 Whole Grain Noodle dough
yield about 16 oz of noodles
2 cups high quality well ground high protein wheat flour ( I grind my own from Hard white wheat so I know it's fresh).
3 eggs or 3/4 cup egg whites
1 tsp salt if desired. (I use my all purpose seasoning blend)
Directions:
Directions:
Combine the flour and salt/seasoning. Dig a well in the flour and add the eggs.
 With a fork, whisk the eggs into the flour forming a soft-batter type stuff, soft dough and then a nice rough dough.
 Stir well. There may be a little flour left over that doesn't mix into the dough. make a rough ball out of the stuff that sticks together. I clear off my table top of any extra flour and funky dough. Lightly flour counter tops.
 Knead the dough a few minutes until it gets well combined and a lot smoother. It will still look a little rough, but the whole wheat is just that way. Divide into two balls.
 Take one of the balls of dough and roll it out on a well floured table top, about 1/2 inch thick and 2 feet long.
 Fold dough into thirds like a travel brochure.
 Roll out the dough again, on a well floured surface until it is about 3 feet long.
 Repeat the folding step and roll one last time until it is very very thin, about 1/8 an inch or less. Mine is so thin you can almost see through it. A well floured table top will really help this process...but also some good muscles applying the pressure to the center of the rolling pin instead of the handles.
When rolled out, it is about 5 feet long.
 With a sharp knife or pizza cutter, make the cuts for the noodles. Make sure you get through all of the dough and the noodles are about 1/4 inch wide and 12 inches long. Repeat the whole process with your second ball of dough.
 Transfer the noodles to a drying rack and allow to air dry a few minutes. This is when I start my water boiling to cook noodles. If you want to allow them to air dry a few hours that works as well.
When the chicken is cooked and the vegetables tender, put the noodles in all at once and cook 2-4 minutes (depending on how long you let them dry). The Bakeroose put them all on a cutting board so it would be easier to transfer them to the boiling pot of chicken and veggies.
 Now, it's very important that an adult help with transferring to the boiling water, as we don't want anyone to get burned. Remember it doesn't take very long to cook the noodles if they are homemade. In fact, by the time we had the bowls out...the noodles where ready.
 This made a whopping one gallon of soup. Not very expensive, and yet very fun. We dare you to try it.
There you go.
Subscribe to:
Posts (Atom)