What are we about here at Bakeroose?

Chef Stephanie Petersen is know as Chef Tess Bakeresse. She is joined in her cooking adventures here on the Bakeroose blog by her two sons, Little Man and Face. We also have regular posts from other Little Chefs who share their cooking adventures. Our kid's blog is a help to moms, grandmas, grandpas and caregivers. We want to help a whole new generation of cooks get excited about the culinary world. If you cook together and have the desire to join our Bakeroose, feel free to send an email to Chef Stephanie Petersen (chef-tess@hotmail.com). If we like what we see, we'll add your story! That simple. If you homeschool, welcome! We have a twice monthly bakeroose class that will be highlighted on this blog as a way to incorporate food science into your child's education. We hope you want to come back again and again. Even better, we hope you like it enough to want to share your cooking experiences and anything you learn along the way! We are so excited to hear from you! Chef Stephanie's main blog is http://www.cheftessbakeresse..com/

Cooking class information can be found here:

Kids Cooking Classes

Any class Chef Tess teaches with kids will usually be added here automatically! So...how cool is that?!

Thursday, October 20, 2011

Chicken Noodle Salad

Hi!!! This is Dolphin Girl with what we're cooking in Shanghai China :D
This is a family favorite, Chicken Noodle Salad, My mom has been making it for I don't know a while. Now,  some people might look at the title and have an image of noodles, lettuce, and chicken in their mind. (maybe not, but that is what some people might think :D) But look at the recipe and you will see that it does NOT have ANY lettuce in it that might make it a regular salad, or else, I wouldn't be posting this on MY blog! I am one of the people who dislike lettuce (shudders) so sorry green-salad-likers I don't. Well anyway it is made up of Noodles, Chicken and a sauce with spices and seasonings in it. Now we weren't able to add any chicken, so it was just noodle salad, we didn't have any chicken just then. So here it is:


Chicken Noodle Salad.


1 lb skinny noodles, (it can be whatever kind of noodles that you want :D)
6 Tbs rice vinegar,
2 Tbs chili sauce (or chili powder whatever you have)
1/4cup oil,
5 Tbs soy sauce (now if you have gotten soy sauce from China, do about 3tbs of it)
2 Tbs sesame seed oil,
2 cups cooked diced chicken,
some basil. (as much as you want or need :D)


Cook noodles as directed. Mix with above and mix in the basil so that it is all over the noodles. Serve warm or cold. and here are some pics that we took of it:


Guess what this is?? post in a comment with what you think it is :D

Here's another guessing game :D guess what this is and the one above, and you Can't cheat by using Google Translate, it must simply be a guess :D

These are the noodles in a bowl, they were Very good, but  a little salty.

Ema Had to take a picture of Someone eating it, and it Had to be me :D Please just ignore Nathan in the background :D (I am thinking *Hurry up!!! And take it. It is HOT!!* :D)

Monday, October 17, 2011

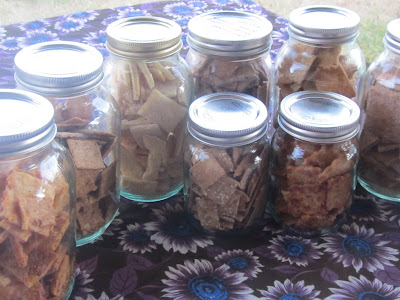
Homemade Cheese Crackers

Okay kiddos...how many of you like cheese crackers? We make a lot of them at our house and I thought I'd give you  quick tutorial. You need permission from an adult/parent to use the oven or need to make them with a parent or adult. You'll need several sheet pans, a large mixing bowl, measuring cups and spoons, a rolling pin, a pizza cutter some non-stick spray for the pans. 
 As for the cheese crackers. Let's begin. As a random fact, mine don't have any fake stuff in them so they're good that way. I also like to see the cheese...so if you like an orange cracker, you may have to melt your cheese more than I do. 

 Chef Tess' Homemade Gourmet Cheese Crackers


1 cup freeze dried cheddar cheese (or 3/4 cup sharp cheddar cheese)
1/2 cup warm water
2 1/2 cup whole wheat pastry flour OR 2 1/2 cup all purpose flour
1/4 cup olive oil
1/2 tsp baking powder
1/2 tsp salt


salt and seasoning of your choice. I use Chef Tess All Purpose Seasoning  


Directions: Preheat oven to 375 degrees.
In a bowl combine the flour, salt and baking powder. 


 Combine cheese and water. If you use fresh cheese, use only 1/4 cup water. The warmer the water, the better melted the cheese will be...but don't get it too hot or it will be gooey cheese. We want it to be able to blend. If using the freeze dried cheese, let it soak about 10 minutes.

Measure your pretty olive oil. I use Lucero Olive Oil because I adore the flavor. Make sure it's a good oil folks. 

 Combine the dry ingredients with the cheese mixture.


 Add the oil.


Mix until just combined. It only took about a minute.

Roll half of dough out on a lightly oiled baking stone. 


 Use a pizza cutter or a pastry cutter to cut the dough into squares.
 Prick with a fancy cracker making tool...like a fork.


I lightly mist the crackers with a little water from a spray bottle and then sprinkle with seasoning. Bake in preheated oven for 15-20 minutes until crispy. Mmm.
 I really love seeing the cheese in my crackers...but again, if you are more conventional...let the cheese melt a little longer.
There you go! Homemade cheese crackers. I'm looking forward to seeing all the ones you make!  Do you want the printable PDF for all the rest of the recipes for the class? Go here. Enjoy!


Thanks to Auntie Em!
 Get the printable of this tutorial:


cheese cracker tutorial PDF

Thursday, October 13, 2011

Chinese Crepes

Hi!! This is Dolphin Girl :D
Now I know that there is already a recipe for crepes on this website, but I didn't put the recipe on here, just the pics about our crepe making adventures in Shanghai China.
And I know what you people must think, Chinese Crepes? There isn't such thing! But there is, This morning we were able to make a French dish, in China. And I was able to make them. I was taught (By Arizona's Chef Tess) that ANYONE can make crepes. They are one of the simplest dishes that the French could EVER come up with!!!  The recipe that we used was Stephanie Peterson's recipe for crepes.  Thank You Miss Stephanie :D


 And here are the pictures that I took of our crepes this morning:
this is the crepe in the pan, look at all the goodness:)


This is my dad, cooking crepes.
This is the table before we sit down to eat.


And this is the "Aftermath" of a successful  crepe breakfast


I thank Miss Stephanie for giving us that cooking class that also gave us the recipe for crepes. It was the one of the 3 best breakfasts I have had since we left America. And one of the 2 best breakfasts that the rest of the family has had since we got here:D Thank You Miss Stephanie :D
                       Dolphin Girl

Monday, October 3, 2011

A Challenge for My Bakeroose (Even in China!)


Tuesday's Tutorial is one I have been working on for a long time. I think a lot of times it easy to get caught up in my mind with a "this is how we cook" mental state. In the last few years I've studied and applied the use of  
Solar cooking , including the building of several different Solar Oven cookers.  I've come a long way since My first solar oven   

In that process I learned a lot. Number one, first and foremost...I can learn something new everyday.  Second...I should learn something new about how to cook food.  I'm a chef and as food is hard wired in my brain so is the absolute desire to see that people all over the world are blessed.  I have a vision of seeing lives changed every day through my efforts...and I hope you do too. I know that together, we can make a difference.  Wow. I just got really sappy right there.  {Insert suave eyebrow raise} I know.  I don't do that often.


So...my challenge to the Bakeroose...I want you to try cooking with a new method. The method is here: Heat-retention Cooking  


 These are the Zuni Gold beans. I think they're pretty. I'd hot glue them to my favorite funky-purse and wear them as a snazzy accessory...but I think today we'll just cook them instead. Right?{ I'm secretly stuffing some in my pocket of to my right side. Now I'm mystically waving my hands in front of your face. You didn't see anything.}
 Our Heat Retention cooking class starts NOW.  For more on this amazing cooking method look HERE. It's not, in fact, a new method!   I've used my solar cooker as a sun-less cooker! Yes...it can be done! You can cook without the sun too! It's been particularly off-n-on sunny the last bit so I wasn't sure if I could pull it off...but I did. So I'm showing you. I did the post on Using Your Sun Oven as a Slow Cooker 101
 but failed to mention what to do should the sunlight be intermittent or it get cloudy shortly into your cooking. Heaven forbid! Well...there is salvation. You who don't have a solar oven, can also still cook without one using this method.
 Soak the beans in water overnight. Drain. Add 6 cups more water.  Bring to a simmer and cook 15 minutes in a pot on the stove (or in the solar oven, cook 20 minutes until at 350 degrees.)
 At this point, let's hypothetically say that the sun goes behind the clouds. In Arizona we've had several days like this lately. Annoying. But...I've found this out...I can sitll cook the beans. Cover the pot quickly. The more full the container the better.
 Cover the pot with towels, tightly fitting them around the bottom and sides of the hot pot. If you don't have a solar oven, this method will also work using a hay basket lined with blankets.  For more on this amazing cooking method look HERE.
 Close up your solar oven and allow beans to cook for 1 1/2 hours or more. Up to 8 hours.

Okay. So that's your assignment. Those in China can do it too! Report back your results and things you've learned. I'm excited to hear how it goes.

There you go!...That means it's your turn my friends.
Lots of Love!
Chef Tess.

Monday, September 26, 2011

Homemade Maple Syrup!


HI!!!!
So this is Dolphin Girl :D and this is a recipe for SYRUP!!! it is AMAZING!!! So I was only able to get 2 pics of it. Anyway where I live syrup is VERY expensive (just for an update I am living in Shanghai China) so we were finally able to get the recipe from some friends of ours, and here it is:

Homemade Maple Syrup.
1cup white Sugar,
1cup Brown sugar,
1cup Water,
and some maple flavoring (I don't know how much sorry :(  )

The syrup in the bottle
The syrup in the pot, some nice dark goodness :D
Then you mix the sugars and water on the stove, just until it bubbles then add the maple flavoring. Then you wait for it to cool just enough to not burn yourself and still have it a little bit warm. Then there you go :) Some very good Maple Syrup.

                                                                              See You!!!!
                                                                             Dolphin Girl

Friday, February 25, 2011

Pita Bread with Hummus

One of our favorite dips and foods is Hummus.


Today with the Bakereoose we will be making the classic Pita Bread with Hummus

How to Make Pita Pocket Bread


T dry yeast
1 cup warm water
1T sugar
1 tsp salt
1T olive oil (I used a garlic infused oil)
1 cup whole wheat flour
2 cups bread flour

Dissolve yeast in 1/2 cup of warm water. Add sugar and stir until dissolved. Let sit for 10-15 minutes until water is frothy.

Combine flour and salt in large bowl.
Make a small depression in the middle of flour and pour yeast water in depression.
Slowly add 1 cup of warm water, and stir with wooden spoon or rubber spatula until elastic.
Place dough on floured surface and knead for 4-minutes.
When the dough is no longer sticky and is smooth and elastic, it has been successfully kneaded.

Coat large bowl with vegetable oil and place dough in bowl. Turn dough upside down so all of the dough is coated. Cover bowl.
Allow to sit in a warm place for about 1 1/2 hours, or until it has doubled in size.


Once doubled, roll out in a rope, and pinch off 10-12 small pieces. Place balls on floured surface. Let sit covered for 10 minutes. Preheat oven to 500 deg F. and make sure rack is at the very bottom of oven. Be sure to also preheat your baking sheet.

Roll out each ball of dough with a rolling pin into circles. Each should be about 5-6 inches across and 1/4 inch thick.


Bake each circle for 4 minutes until the bread puffs up. Turn over and bake for 2 minutes.
Remove each pita with a spatula from the baking sheet and add additional pitas for baking.

Take spatula and gently push down puff. Immediately place in storage bags.

Hummus 101

Hummus is a dip or spread made from chickpeas. Hummus is in fact the Arabic word for chickpea. Hummus has been eaten since ancient Egyptian times. Over 7,000 years ago. In almost every culture the use of mashed beans in some form are used.They are an excellent form of protein. Coupled with pita bread they provide all the essential components of a complete protein. Many people around the world don't eat meat to get their protein. The combine grains and legumes (beans and grains) to get all that their bodies need. It's a wonderful way to eat. There are not any set in stone recipes for hummus. When you don't have tahini, you may use sesame oil or sometimes we use sesame seeds. Tahini is a paste made from toasted sesame seeds. It's very strongly smoky flavored from the sesame.


Hummus with Tahini

1 16 oz can of chickpeas or garbanzo beans

1/4 cup liquid from can of chickpeas

3-5 tablespoons lemon juice (depending on taste)

1 1/2 tablespoons tahini

2 cloves garlic, crushed

1/2 teaspoon salt

2 tablespoons olive oil

Preparation:

Drain chickpeas and set aside liquid from can. Combine remaining ingredients in blender or food processor. Add 1/4 cup of liquid from chickpeas. Blend for 3-5 minutes on low until thoroughly mixed and smooth.Place in serving bowl, and create a shallow well in the center of the hummus

Roasted Red Pepper Hummus

1 can of chickpeas/garbanzo beans (15 oz

1/3 cup tahini

1/4 cup lemon juice

2 tablespoons olive oil

2 garlic cloves, crushed

1/2 cup -3/4 cup roasted red peppers (depending on taste)

Put all ingredients in a blender or food processor and blend until smooth.

Sun Dried Tomato Hummus

1 can garbanzo beans/chickpeas (15 oz.), drained

3 tablespoons sun dried tomatoes in oil

2 teaspoons parsley

2 tablespoons olive oil

2 tablespoons lemon juice

Preparation:

In a food processor, combine all ingredients and process until smooth and creamy. If too thick, add 1 tablespoon water until desired consistency.

thank you to About.com for the useful hummus recipes in this post: http://mideastfood.about.com/od/hummusrecipes/tp/kids_hummus.htm

Wednesday, February 9, 2011

Oh Crepes!

Our family has been making crepes since EmaBug's birthday last month.

"A crêpe is a type of very thin pancake, usually made from wheat flour. The word is of French origin, deriving from the Latin crispa, meaning "curled." "

Today we made white flour and whole wheat flour crepes.


"Mise en place is a French phrase defined by the Culinary Institute of America  as "everything in place", as in set up. It is used in professional  kitchens to refer to organizing and arranging the ingredients that a  cook will require for the menu items that he or she expects to prepare  during his/her shift.[1]"


Stir, stir, stir


 Thank you, Miss Stephanie, for the (silver) crepe pan!!


oops! We are such great cooks that this one even got the fire alarm cheering for us. =}


Here's a whole wheat one cooking. We only got two thumbs down (one person, two thumbs) on these.
Bear: "It tasted a little different, but not that much."
EmaBug: "It's not as light and fills you up more and that's a good thing."
Mom is just happy to have a healthier crepe that tastes good.


Yum! 
4 eggs

1 cup water

2 tsp vanilla


Blend in blender or really well by hand.
1 c. flour
1 T. sugar
1/3 c. instant powdered milk
1/2 tsp. salt
In a separate container, combine the wet ingredients very well. Add the wet to the dry and mix until all the lumps are gone. You may have to use a strainer. The batter should be just thick enough to coat the back of a spoon. Use a very small amount of oil in a non-stick skillet. I use an 8 inch skillet...and Medium low heat. If your pan is too hot the crepe batter will start to cook before you can coat the pan with it. I use 1/4 cup batter and just roll the pan around until the batter lightly coats the bottom of the pan. Cook 2-3 minutes on one side and then gently turn over. Usually you'll have one side that gets a little more brown than the other.
>